Flan

Flan

A Taste of Tradition: Crafting the Perfect Flan

Step into the world of sweet indulgence with a classic dessert that has stood the test of time – flan. With its velvety texture and caramelized allure, flan is a culinary masterpiece that never fails to delight. Today, I invite you to join me on a journey as we uncover the secrets to creating the perfect flan, one silky spoonful at a time.

The Art of Preparation

Our journey begins with the creation of the golden caramel that will adorn our flan with its irresistible sweetness. In a dance of heat and chemistry, sugar, water, and a touch of lime juice come together to form a luscious syrup. As the mixture simmers and transforms into a rich amber hue, we know that something magical is taking place. With a delicate touch, we pour this liquid gold into our waiting mold, where it will cool and set, ready to embrace the creamy custard that will soon follow.

Now, let’s turn our attention to the heart of our dessert – the main flan mixture. In a symphony of flavors and textures, eggs, egg yolks, vanilla, evaporated milk, rum, sweetened condensed milk, and table cream unite to create a harmonious blend that is as rich as it is decadent. With each ingredient carefully measured and lovingly combined, we set the stage for a culinary masterpiece that will tantalize the taste buds and captivate the senses.

With our caramel-coated mold awaiting its creamy counterpart, we preheat the oven and prepare to bring our flan to life. In a moment of anticipation, we pour the main flan mixture into the mold, where it mingles with the cooled caramel, creating a marriage of flavors that is nothing short of divine. As we carefully place the mold in a water bath and cover it with foil, we know that something special is about to happen. With the oven as our ally, we let our flan bake to perfection, allowing the gentle heat to coax out its creamy essence and transform it into a dessert worthy of the gods. After an hour of patient waiting, we remove the flan from the oven, its surface set and its aroma filling the air with promises of sweet delight. With a sense of satisfaction, we let it cool, knowing that the best things in life are worth waiting for.

Flan

Cook Time 1 minute
Total Time 1 minute

Ingredients
  

Ingredients:

  • o 240g white sugar
  • o 6 tablespoons of water
  • o Juice of half a small lime

Main flan mixture:

Ingredients:

  • 4 eggs.
  • 3 egg yolks.
  • 60 g vanilla.
  • 1 teaspoon vanilla paste.
  • 330 g evaporated milk Carnation brand.
  • 40 g rum.
  • 375 g sweetened condensed milk.
  • 200 g table cream.

Instructions
 

Caramel:

    Instructions for the caramel:

    • Mix everything together in a saucepan over low heat and let it simmer until the sugar dissolves and turns a light amber color.
    • Pour the caramel into a 22.8x15.7 mold and put it in the freezer to cool.

    Main flan mixture:

      Instructions: (Best prepared a day in advance)

      • Preheat oven to 350°F.
      • In a bowl, mix everything together.
      • Pour the mixture into the caramel-lined mold.
      • Place the mold in a water bath and cover it with aluminum foil. Bake for 1 hour at 350°F.
      • Once it sets, remove from the oven and let it cool.

      Perfect Flan with Love and Tradition

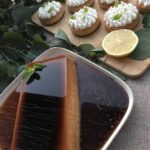
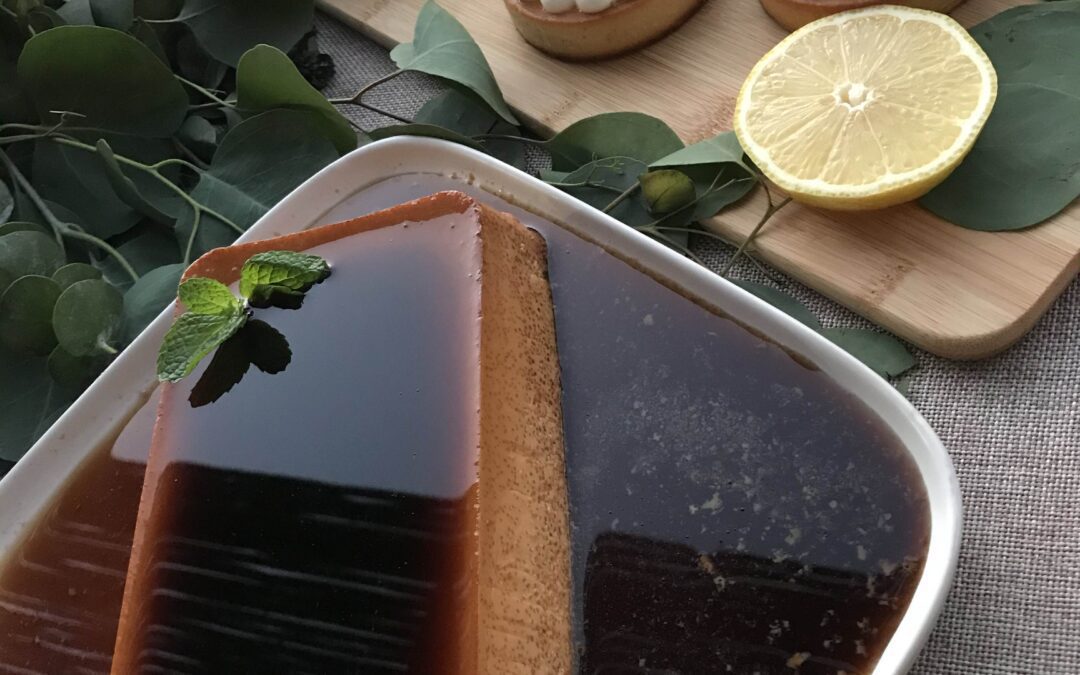
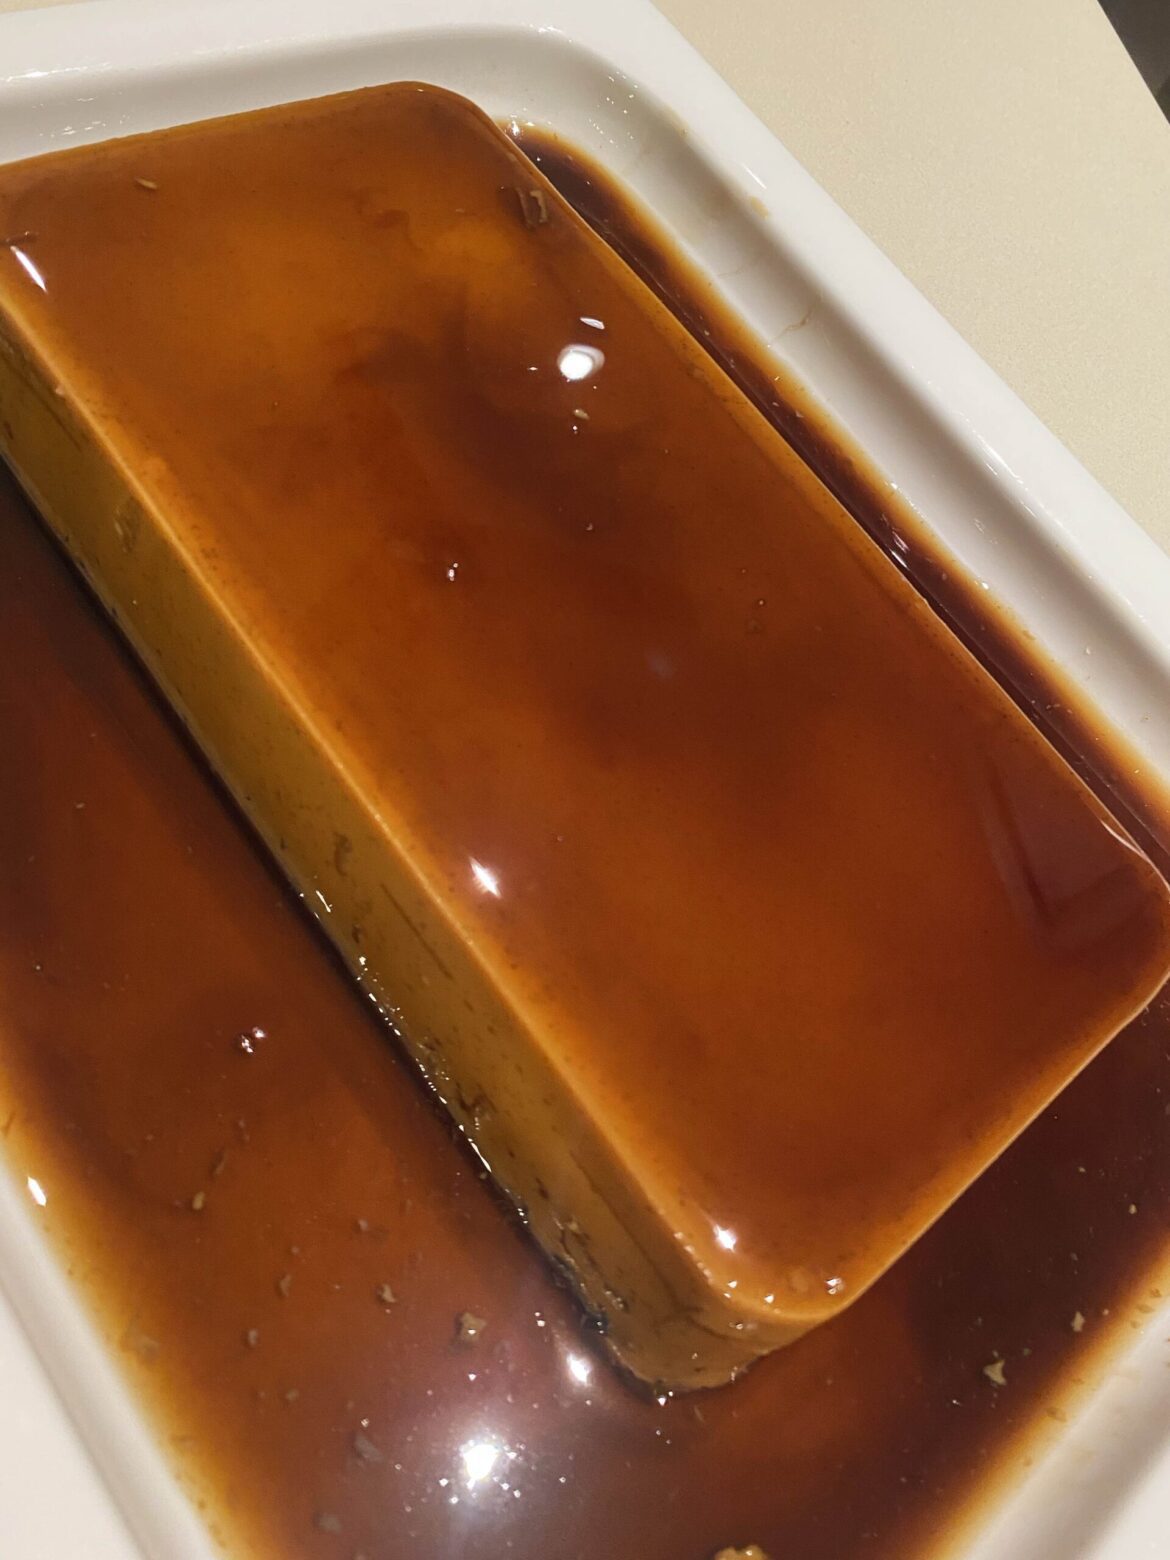
      Finally, the moment we’ve been waiting for has arrived. With a confident flip of the mold, we release our flan from its caramel embrace, revealing its silky smooth texture and golden hue. With each spoonful, we savor the creamy richness of the custard and the sweet kiss of caramel, transported to a realm of culinary bliss that only flan can provide.

      In conclusion, crafting the perfect flan is a labor of love – a testament to the beauty of simple ingredients and the power of tradition. So, whether you’re sharing it with loved ones or indulging in a moment of solitude, I encourage you to savor every bite and appreciate the magic that happens when sugar, eggs, and a touch of rum come together in perfect harmony.

      Are you interested in learning more?

      Follow topics related to recipes on our newsletter or instagram.

      Join our

      Newsletter

      To stay in the loop, we invite you to sign up for our newsletter. By doing so, you will receive regular updates straight to your inbox, keeping you informed of everything Mo.Bo. Cabo has to offer.

      Pizza Dough

      Pizza Dough

      Crafting the Perfect Pizza Dough: A Homemade Masterpiece

      Are you ready to elevate your pizza game to new heights? There’s something truly special about making your own pizza dough from scratch. With our foolproof recipe and a touch of love, you’ll embark on a culinary adventure that culminates in a mouthwatering pizza experience like no other. At the heart of any great pizza is the dough, and ours is crafted with care using just a handful of essential ingredients: flour, water, yeast, salt, olive oil, and a dash of honey. These simple yet crucial components come together to form the perfect canvas for your favorite toppings.

      The Art of Preparation

      Let’s dive into the process of creating this culinary masterpiece. First, we start with the sponge—a mixture of water, yeast, flours, and honey left to ferment for nearly two hours. This initial step sets the stage for flavor development, ensuring a dough that’s both airy and flavorful. Once the sponge is ready, it’s time to bring our dough to life. Mixing the sponge with the remaining flour, water, and salt, we knead until the dough reaches the perfect consistency. A brief fermenting period allows the flavors to meld and the dough to rise, creating that coveted light and airy texture.

      After the dough has had time to ferment and rise, it’s ready to be shaped into individual pizza bases. Dividing the dough into manageable portions, we carefully shape each one into a ball, ensuring a uniform thickness and texture. A brief rest allows the dough to relax before it’s ready to be stretched and topped with your favorite ingredients. With your pizza dough shaped and ready to go, it’s time to add your personal flair. Whether you’re a fan of classic Margheritas or prefer to pile on the toppings, the choice is yours. Spread your favorite sauce, sprinkle on your preferred cheese, and layer on an array of toppings—from savory meats to vibrant veggies. As your homemade pizza bakes to golden perfection in the oven, anticipation builds with each passing minute. The aroma fills your kitchen, tantalizing your taste buds and whetting your appetite. And when that first slice is finally served, you’ll understand why the journey of crafting your own pizza dough is worth every moment.

      Ready to Embark on Your Pizza Journey?

      With our tried-and-true recipe in hand, you’re equipped to embark on a pizza-making adventure that’s as rewarding as it is delicious. So roll up your sleeves, gather your ingredients, and prepare to experience the joy of crafting your very own pizza dough masterpiece. From kneading to baking, every step is an opportunity to savor the process and delight in the final result.

      Are you ready to elevate your homemade pizza game? Let’s get started!

      Pizza Dough

      Experience the joy of crafting your own pizza dough with our foolproof recipe. With a handful of essential ingredients like flour, water, yeast, salt, olive oil, and a pinch of love, you can create a mouthwatering foundation for your favorite toppings. Add your favorite sauce, cheese, and toppings, then bake it until the crust turns golden and irresistible. Get ready to savor every bite of your homemade pizza masterpiece!
      Prep Time 45 minutes
      Resting Time 1 hour
      Total Time 1 hour 45 minutes

      Ingredients
        

      Ingredients:

      • 625 g water.
      • 9 g yeast.
      • 830 g flour.
      • 20 g whole wheat flour.
      • 20 g corn flour.
      • 22 g honey.
      • o 22 g salt.
      • o Olive oil.

      Instructions
       

      For the sponge:

        Preparation:

        • Mix 425 ml of water with 1 package of yeast, 370 g of flour, corn flour, whole wheat flour, and honey.
        • Ferment for 1 hour and 50 minutes.
        • For the dough:

        Preparation:

        • In a mixer, add the sponge and the remaining flour, water, and salt. Mix well and knead until it begins to come off the sides. Then, transfer to a bowl with olive oil and let it ferment for 45 minutes.
        • Deflate the dough, fold it four times towards itself, and let it ferment for another 45 minutes.
        • Deflate the dough again and divide it into 6 balls of 230 g each. Shape them into balls and place them on a tray. Let them rest covered and floured for 5 minutes.
        • Then, transfer them to a container with a lid and let them rest for 1 hour before using them.

        Embrace the Joy of Homemade Pizza

        As the aroma of freshly baked pizza fills your kitchen and the anticipation of that first bite reaches its peak, take a moment to savor the journey you’ve embarked upon. Crafting your own pizza dough isn’t just about creating a meal—it’s about embracing the joy of the process, from mixing and kneading to shaping and baking. With our foolproof recipe as your guide, you’ve unlocked the secrets to making pizza dough that’s not only delicious but also uniquely yours. Each step of the process is an opportunity to infuse your creation with love and creativity, resulting in a homemade masterpiece that’s sure to delight family and friends alike.

        So whether you’re hosting a pizza night with loved ones or simply treating yourself to a well-deserved indulgence, take pride in knowing that every slice of your homemade pizza tells a story of passion and craftsmanship. From the first crispy bite of the golden crust to the last savory morsel of melted cheese, this is a culinary experience worth savoring. So go ahead, gather your ingredients, roll up your sleeves, and let the magic of homemade pizza dough take you on a journey of flavor and delight. Experience the joy of creating something truly special from scratch, and relish every moment of the delicious adventure that awaits.

        Here’s to many more pizza nights filled with laughter, love, and the unmistakable satisfaction of knowing that you made it all from scratch. Bon appétit!

        Are you interested in learning more?

        Follow topics related to recipes on our newsletter or instagram.

        Join our

        Newsletter

        To stay in the loop, we invite you to sign up for our newsletter. By doing so, you will receive regular updates straight to your inbox, keeping you informed of everything Mo.Bo. Cabo has to offer.

        Scones

        Scones

        A Citrus Twist: Irresistible Lime Scones

        As dawn stretches its fingers across the sleepy countryside, the kitchen stirs with anticipation. There’s a scent in the air, a promise of something delightful to come. Today, we embark on a culinary journey to create an irresistible treat: Lime Scones.

        Gathering our ingredients is akin to assembling the cast of characters for a grand performance. Flour, sugar, baking powder, and a pinch of salt; they form the sturdy foundation upon which our scones will stand. But it is the zest of a lime that adds the unexpected twist, infusing our creation with a burst of citrusy freshness.

        The Art of Preparation

        In a dance of precision, we measure, we mix. The dry ingredients intermingle, forming a harmonious symphony of flavors. But it is the butter, grated and frozen, that truly elevates our scones to greatness. Like flecks of gold, it promises a richness that will melt in our mouths with every bite. Butter meets cream, eggs join the fray. They blend effortlessly, creating a velvety canvas upon which our lime zest will paint its vibrant strokes. With each fold and turn, our mixture takes shape, a testament to the artistry of baking.

        As the oven preheats to a toasty 375°F, we prepare our stage. A baking sheet, lined with parchment paper, awaits the grand entrance of our scone dough. With deft hands, we pour, we shape, we freeze. And in the quiet solitude of the freezer, our scones find their voice, ready to sing in golden hues. Emerging from their icy slumber, our scones take center stage. The oven embraces them warmly, coaxing out their hidden depths as they transform into golden beauties. And as the aroma of freshly baked goodness fills the air, we know that our creation is nearing perfection.

        But wait, there’s one final touch to elevate our scones from mere confection to culinary masterpiece. A gentle brush of butter, a sprinkle of sugar, like a crown adorning royalty. With this flourish, our lime scones are ready to dazzle.

        Scones

        Prep Time 20 minutes
        Total Time 20 minutes

        Ingredients
          

        Ingredients:

        • o 2 cups of flour.
        • o 3 tablespoons of sugar.
        • o 1 teaspoon of baking powder.
        • o 1 pinch of salt.
        • o 145g of butter.
        • o Zest of 1 lime.
        • o 1 cup of Lyncott heavy cream.
        • o 2 eggs.
        • o 1 teaspoon of butter.

        Instructions
         

        Preparation:

        • Preheat the oven to 375°F.
        • Mix dry ingredients.
        • Grate and freeze butter.
        • Combine all dry ingredients with wet ingredients and grated butter.
        • Pour the mixture onto a baking sheet lined with parchment paper, try to make a circular shape (cut into a pizza shape, and it makes up to 6 scones). Freeze for at least 20 minutes.
        • Separate each piece and bake until golden brown. (Optional: brush with butter and sprinkle with sugar).

        From Kitchen Creations to Culinary Delights

        As we gather around the table, anticipation hangs in the air. With eager hands, we break into our freshly baked treasures, savoring each crumb, each burst of lime-infused bliss. And in that moment, we know that our culinary journey has reached its pinnacle.

        So, dear reader, I invite you to embark on your own adventure into the world of baking. With a recipe as delightful as this, the possibilities are endless. So gather your ingredients, preheat your oven, and let the magic unfold. After all, there’s nothing quite like the taste of homemade Lime Scones to brighten your day.

        Are you interested in learning more?

        Follow topics related to recipes on our newsletter or instagram.

        Join our

        Newsletter

        To stay in the loop, we invite you to sign up for our newsletter. By doing so, you will receive regular updates straight to your inbox, keeping you informed of everything Mo.Bo. Cabo has to offer.

        Brioche

        Brioche

        Golden Treasures: Unlocking the Delights of Homemade Brioche

        In the quiet of dawn, there’s a whisper in the kitchen, a soft rustling of flour meeting yeast, a dance of ingredients coming together to create something truly magical – the brioche. As the sun peeks through the curtains, filling the room with a warm glow, it’s time to embark on a journey of culinary delight, following a recipe that promises to elevate your morning ritual to new heights.

        The Art of Preparation

        Every masterpiece starts with a foundation, and for our brioche, it begins with a delicate sponge. In a symphony of flavors, flour meets yeast, activated by a splash of warm milk, and a drizzle of golden honey. As the ingredients intertwine, they rest, allowing the yeast to work its magic, transforming the mixture into a frothy, bubbling concoction over 45 minutes.

        With the sponge laying the groundwork, it’s time for the dough to take center stage. In a mixer, flour, sugar, eggs, and salt unite, each adding its own melody to the composition. But it’s the addition of the sponge that truly sets the stage for greatness. As the mixer whirls, the dough begins to come to life, slowly pulling away from the sides, a sign of its impending transformation. Butter, the secret ingredient to richness, is added gradually, each pat melting into the dough, infusing it with indulgent flavor. Covered and left to ferment, the dough breathes, doubling in size as it dreams of the delicious destiny that awaits.

        With patience and precision, the dough is gently deflated, its airy texture begging to be shaped into something extraordinary. Divided into equal parts, each portion is lovingly flattened into a rectangle, then folded like a cherished letter, a ritual of care and attention. Rolling each piece with practiced hands, they are nestled into molds, their potential evident as they rise, doubling in size once more. A glaze of golden egg yolk is brushed lovingly over their surface, a promise of the decadence to come.

        As the oven preheats to a perfect 375°F, anticipation fills the air. Molds, greased and lined with parchment, eagerly await their cargo. With a gentle touch, the molds are placed in the oven, the brioche baking slowly, filling the kitchen with the aroma of buttery goodness. Minutes pass like hours as we wait, the scent growing more tantalizing with each passing moment. And then, just as anticipation reaches its peak, they emerge from the oven, golden brown and glistening, a testament to our patience and dedication.

        Brioche

        Prep Time 28 minutes
        Resting Time 45 minutes
        Total Time 1 hour 13 minutes

        Ingredients
          

        For the sponge:

        Ingredients:

        • o 128g flour.
        • o 1 packet of yeast.
        • o 1/2 cup of milk.
        • o 1 tablespoon of honey.

        Dough:

        Ingredients:

        • o 6 eggs.
        • o 384g flour.
        • o 105g sugar.
        • o 12g salt.
        • o 227g butter.

        Instructions
         

        For the sponge:

          Preparation:

          • Activate yeast with warm milk and let it rest for 5 minutes.
          • Add honey and flour.
          • Let rest for 45 minutes.

          Dough:

            Preparation:

            • Preheat oven to 375°F. Grease molds and prepare with parchment paper.
            • In a mixer, add flour, sugar, eggs, salt, and the sponge.
            • Beat until the dough starts to pull away from the sides, at least 13 minutes.
            • Add butter gradually until it incorporates completely and the dough pulls away from the sides.
            • Cover the buttered dough in a bowl and let it ferment for 60 minutes or until it doubles in size.
            • Deflate the dough and divide it into two equal parts.
            • Divide each part into 6. Flatten each part into a rectangle, fold it like a letter, flatten it again, and roll each one of the parts.
            • Place the 6 rolls into a mold.
            • Cover and let it double in size.
            • Brush with egg yolk and bake on the middle rack for at least 30 minutes or until completely golden brown.
            • Remove from the oven and let cool.

            Heaven’s Secret: Mastering the Art of Brioche

            As we gaze upon our creation, a sense of pride washes over us. The brioche, once a simple mixture of flour and yeast, has been transformed into a work of art, a testament to the power of patience and passion.

            With eager hands, we remove them from their molds, their soft crumb yielding beneath our touch. And as we take that first, blissful bite, we are transported to a world of pure delight, where every mouthful is a symphony of flavors, a celebration of the simple joys of life.

            So, dear friends, as you embark on your own culinary journey, remember the magic that lies within a simple recipe. For in the kitchen, as in life, it is the moments of patience and passion that truly make our creations shine.

            Are you interested in learning more?

            Follow topics related to recipes on our newsletter or instagram.

            Join our

            Newsletter

            To stay in the loop, we invite you to sign up for our newsletter. By doing so, you will receive regular updates straight to your inbox, keeping you informed of everything Mo.Bo. Cabo has to offer.

            Focaccia

            Focaccia

            A Journey Through the Aromas of Italy: the Perfect Focaccia

            As the morning sun bathes the kitchen in a warm glow, there’s an undeniable sense of anticipation in the air. Today, we embark on a culinary adventure, one that will transport us to the sun-drenched shores of Italy with every bite. Our destination? The rustic charm of a classic focaccia, a timeless delight that captivates the senses and beckons us to savor the simple pleasures of life.

            The Art of Preparation

            With a gentle touch, we bring together the elements, marrying the wet and dry into a harmonious union. Two tablespoons of olive oil dance amidst the flour, weaving their way into the fabric of our dough, infusing it with their golden essence. With each fold and turn, we knead with purpose, shaping not just a loaf but a story waiting to be told.

            As the dough rises, so too does our anticipation, a symphony of aromas filling the air with the promise of what’s to come. An hour passes like a fleeting moment, yet in that time, our creation has blossomed, a testament to patience and perseverance. With tender care, we gently deflate the dough, transferring it to a waiting tray, where it stretches and sighs, embracing its newfound freedom.

            With a steady hand, we guide our creation into the welcoming embrace of a preheated oven, where heat and time work their magic, transforming humble ingredients into a masterpiece of flavor and texture. And as the scent of freshly baked bread fills the air, we know that our journey is nearing its end, a feast for the senses waiting just beyond the oven door.

            Focaccia

            1 hour
            Total Time 1 hour

            Ingredients
              

            Ingredients:

            • o 1 cup of water or half water and milk.
            • o 1 package of yeast.
            • o 2 cups of flour.
            • o 10g of salt.
            • o ¾ cup of olive oil.

            Instructions
             

            Preparation:

            • Activate yeast with a tablespoon of honey or sugar.
            • In a bowl, mix dry ingredients, together with salt. Mix the liquid of the yeast with the flour, two tablespoons of oil to form a ball.
            • Knead until you get a firm and homogeneous dough, take it to an oiled bowl and cover it.
            • Let the dough ferment in a bowl for an hour.
            • Deflate the dough and transfer it to a previously oiled rectangular tray and leave the dough almost in the same shape as the tray. Let it rest for an hour, give it the distinctive shape of focaccia.
            • Bake in a preheated oven at 400°F until golden.

            One Focaccia at a Time

            Golden and glistening, our focaccia emerges from its fiery crucible, a sight to behold and a joy to savor. With each bite, we are transported to the sun-soaked hills of Tuscany, where olive groves sway in the gentle breeze and laughter fills the air. And as we share this simple yet sublime pleasure with loved ones, we are reminded that sometimes, the truest magic lies in the beauty of the everyday.

            So let us raise a toast to the humble focaccia, a timeless treasure that brings us together and fills our hearts with warmth and delight. For in its simple embrace, we find not just sustenance, but a reminder of the joy that awaits us in every moment, if only we take the time to savor it. Buon appetito!

            Are you interested in learning more?

            Follow topics related to recipes on our newsletter or instagram.

            Join our

            Newsletter

            To stay in the loop, we invite you to sign up for our newsletter. By doing so, you will receive regular updates straight to your inbox, keeping you informed of everything Mo.Bo. Cabo has to offer.